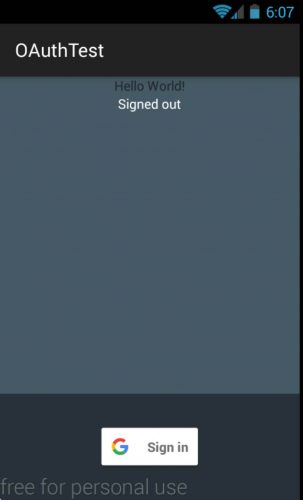
試了一下,在程式裡加入 Gogole Sign-in,還滿簡單的,大約半小時~1小時就可以完成範例程式。試了一下 getID() 可以拿到一串好長好長的id, getEmail() 可以拿到user 的 email, 神奇的是程式不需要存取網路。
最佳的入門教學,應該是官方的這一篇:
Start Integrating Google Sign-In into Your Android App
https://developers.google.com/identity/sign-in/android/start-integrating
先 git clone 別人寫的範例,用修改會比較快:
github 的範例有一個問題,就是 apply plugin 是有問題的,改成這段就OK了。
dependencies {
    compile fileTree(dir: 'libs', include: ['*.jar'])
    testCompile 'junit:junit:4.12'
    compile 'com.android.support:appcompat-v7:24.2.0'

    // Dependency for Google Sign-In (這個版號,會一直被修改)
    compile 'com.google.android.gms:play-services-auth:9.8.0'
}
在修改時,和Facebook Login 最大的差別在Google Sign-in 不需要在 AndroidManifest.xml 裡增加一個 activity 的宣告。
Googe Sign-in 需要使用到一個「configuration file」,這是Facebook login 沒有的。
重新下載Google API 憑證,可以到這裡下載:
Google API Console
https://console.developers.google.com/
需要使用google token 來進行身分驗證,參考這一篇:
Authenticate with a backend server
https://developers.google.com/identity/sign-in/android/backend-auth
重點就是 android code 要多一行 requestIdToken:
GoogleSignInOptions gso = new GoogleSignInOptions.Builder(GoogleSignInOptions.DEFAULT_SIGN_IN)
        .requestIdToken(getString(R.string.server_client_id))
        .build();
拿到token 之後,就可以連去google 問帳號資料:
https://www.googleapis.com/oauth2/v3/tokeninfo?id_token=XYZ123
If the token is properly signed and the iss and exp claims have the expected values, you will get a HTTP 200 response, where the body contains the JSON-formatted ID token claims. Here’s an example response:
{
 // These six fields are included in all Google ID Tokens.
 "iss": "https://accounts.google.com",
 "sub": "110169484474386276334",
 "azp": "1008719970978-hb24n2dstb40o45d4feuo2ukqmcc6381.apps.googleusercontent.com",
 "aud": "1008719970978-hb24n2dstb40o45d4feuo2ukqmcc6381.apps.googleusercontent.com",
 "iat": "1433978353",
 "exp": "1433981953",

 // These seven fields are only included when the user has granted the "profile" and
 // "email" OAuth scopes to the application.
 "email": "[email protected]",
 "email_verified": "true",
 "name" : "Test User",
 "picture": "https://lh4.googleusercontent.com/-kYgzyAWpZzJ/ABCDEFGHI/AAAJKLMNOP/tIXL9Ir44LE/s99-c/photo.jpg",
 "given_name": "Test",
 "family_name": "User",
 "locale": "en"
}
相關文章:
Integrating Google Sign-In into Your Android App
https://developers.google.com/identity/sign-in/android/sign-in?configured=true
Authenticating Your Client
https://developers.google.com/android/guides/client-auth
Add Google Sign-In to Your Android App
https://developers.google.com/identity/sign-in/android/
實作出來的範例:
Google 好心地提醒我們,別把user id 當參數傳給自己的後端server API, 而是要使用被驗證過的token.
Warning: Do not accept plain user IDs, such as those you can get with the
GoogleSignInAccount.getId()method, on your backend server. A modified client application can send arbitrary user IDs to your server to impersonate users, so you must instead use verifiable ID tokens to securely get the user IDs of signed-in users on the server side.
https://developers.google.com/identity/sign-in/android/backend-auth
Verify the integrity of the ID token, 就把token 送 GET 到這個 URL:
https://www.googleapis.com/oauth2/v3/tokeninfo?id_token=XYZ123
If the token is properly signed and the iss and exp claims have the expected values, you will get a HTTP 200 response, where the body contains the JSON-formatted ID token claims. Here’s an example response:
{
 // These six fields are included in all Google ID Tokens.
 "iss": "https://accounts.google.com",
 "sub": "110169484474386276334",
 "azp": "1008719970978-hb24n2dstb40o45d4feuo2ukqmcc6381.apps.googleusercontent.com",
 "aud": "1008719970978-hb24n2dstb40o45d4feuo2ukqmcc6381.apps.googleusercontent.com",
 "iat": "1433978353",
 "exp": "1433981953",

 // These seven fields are only included when the user has granted the "profile" and
 // "email" OAuth scopes to the application.
 "email": "[email protected]",
 "email_verified": "true",
 "name" : "Test User",
 "picture": "https://lh4.googleusercontent.com/-kYgzyAWpZzJ/ABCDEFGHI/AAAJKLMNOP/tIXL9Ir44LE/s99-c/photo.jpg",
 "given_name": "Test",
 "family_name": "User",
 "locale": "en"
}

