什麼是 nice select
雖然在 bootstrap 的世界裡, 已經讓 select 下拉框變的很酷炫與好看, 但是有很多功能還是無法完成, 最佳的解法還是透過 div(圖層) 來解決.
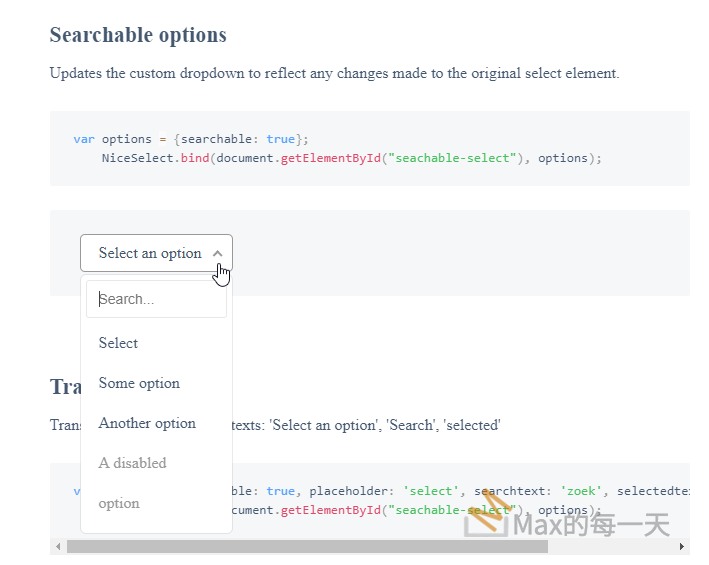
Max 一直都是使用 jquery nice select, 簡稱 nice select 1, 這個版本沒有提供 search 功能, 但是好心人升級的 nice select 2 有支援, 執行畫面如下:

下載點:
- Nice Select
https://github.com/hernansartorio/jquery-nice-select - Nice Select 2
https://github.com/bluzky/nice-select2 - Nice Select 2, Max 修改的版本:
https://github.com/max32002/nice-select2
使用 nice select 2 , 第一個遇到的問題, 是 initial 時無法使用 array 同時處理數個 select tag, 但 nice select 1可以, nice select 2 解法如下:
if (jQuery("select.default-select").length > 0)
{
    const selectItems = document.querySelectorAll("select.default-select");
    selectItems.forEach((userItem) =>
    {
        NiceSelect.bind(userItem);
    }
    );
}
使用 nice select 2 執行上面的程式碼, 會遇到另一個問題, 就是第二次 NiceSelect.bind() 時, 會產生出新的 div 區塊, 所以不能像 nice select 1 一樣, 在 .update() 時, 可以更新回去第一次產生出來的div element.
解法, 很簡單, 也很多個:
- 解法1: 上面的程式碼修改成 gloabl array.
- 解法2: 一個一個的 select 都變成獨立的全域變數.
nice select 1 / 2 的 優缺點比較
如果沒有使用到下拉框的查詢功能, 使用 nice select 1 會比較好, 因為一行指令就可以把網頁裡用的到 select 直接變成 div, 等到有需要同步select 內容時, 才需要額外使用 jQuery 讓 select 裡的內容值, 更新回去div 裡.
nice select 2 暫時無法對同一個select 產生同一個div, 是比較麻煩的地方, 同步上需要另外做控制, 目的版本,是每 .bind(element,option) 一次,都會產生出一個新的 div.
這個解法很簡單,製作一個 global nice_select_2_mapping 的 dictionry, 把特徵放在 key 值,把 bind() 完的 instance 放進 dictionary 裡。
語法:
var nice_select_2_instance = {};然後修改 function u(e, t) 與 f(e, t) 為:
function u(e, t) {
	this.el = e;
	this.config = Object.assign({}, p, t || {});
	this.data = this.config.data;
	this.selectedOptions = [];
	this.placeholder = r(this.el, "placeholder") || this.config.placeholder || "Select an option";
	this.searchtext = r(this.el, "searchtext") || this.config.searchtext || "Search";
	this.selectedtext = r(this.el, "selectedtext") || this.config.selectedtext || "selected";
	this.dropdown = null;
	this.multiple = r(this.el, "multiple");
	this.disabled = r(this.el, "disabled");
	this.create()
}

function f(e, t) {
	let instance = null;
	if(nice_select_2_instance.hasOwnProperty(e.id)) {
		console.log("get exist instance for id:" + e.id);
		instance = nice_select_2_instance[e.id];
	} else {
		console.log("get new instance for id:" + e.id);
		instance = new u(e, t);
		nice_select_2_instance[e.id] = instance;
	}
	return instance;
}
這樣就完成對應了,記得要讓每一個 element 都有設定不重覆的 id attribute 。
上面的程式碼,更新在:
https://github.com/max32002/nice-select2/blob/master/dist/js/nice-select2.js
使用起來可以和 nice select 1 差不多。如果遇到相同 id 的 select 要第二次產生 div, 請先呼叫一次 .destroy(), 這裡的錯字是沿用原作者的錯字。
使用範例:
NiceSelect.bind(document.getElementById('my_content_block_' + node)).destroy();
NiceSelect.bind(document.getElementById('my_content_block_' + node)).update();
說明:一般情況,使用 .update() 就可以。只有遇到相同 ID 要重覆產生,才需要 call .destroy();
nice select 同步時間點
有2個情況下, 需要把 select tag 裡的內容同步回去 div tag 裡,
- select 裡 options 選項內容改變。
- selected default value 不是由使用者透過 div 修改時.
selected 的寫法,並不是 html 預設寫法
這一點,是滿特別的,一般 select tag 在option 裡設定 selected 就會變成預設值,在 nice select 也是沒錯,但由於 nice select 並不會去清除(或重設) selected property, 會造成 selected 項目會愈來愈多。
nice select 1 的解法:
Add a data-display attribute to the desired options. For example:
<select>
  <option data-display="Select">Nothing</option>
  <option value="1">Some option</option>
  <option value="2">Another option</option>
  <option value="3" disabled>A disabled option</option>
  <option value="4">Potato</option>
</select>
nice select 2 額外的問題:彈出的 div 有多個 selected 的項目,預期應該只有一個。
如果你使用的是較舊 nice select 2 版本( Sep 8, 2023 之前),更新為 nice select 2 Sep 8, 2023 的這個版本後,就可以解決 selected 項目沒有被預期地清除的問題,但這個較新的 nice select 2 有新的問題:
部份的 nice select 2 版本,使用上無法用 jquery 的 select_element_obj.val(new_val); 來指定 select 的 option 的 selected. 這個用起來也很麻煩。
應該是為了做 multi selected 造成的。
解法在 .update() 之前,原本寫法:
select_element_obj.val(target_value);解法1: 要改成,或增加下面這一行寫法:
$("#select_id option[value='"+ target_value +"']").attr('selected','selected');除了上面解法,也使用解法2: 換成:
$("#select_id option[value='"+ $("#select_id").val() +"']").attr('selected','selected');上面解法1,解法 2 都沒有 reset 掉 options 裡的 selected attribute, 這也會造成新的問題, 如果是單選,請先 remove attribute:
$(“#select_id option”).removeAttr(“selected”);
但是這樣子一個一個加 removeAttr(),很累,最佳解法應該是使用解法3, 直接修改 root cause。
解法3: 直接修改 nice-select2.js 的 .update() method:
u.prototype.update = function() {
if (!this.multiple) {
	const selected_selector = `option[value="${this.el.value}"]`;
	// PS: must get value before remove attribe.
	const optionItems = this.el.querySelectorAll(`option`);
	optionItems.forEach((Item) => {
		Item.removeAttribute('selected');
	});
	const option = this.el.querySelector(selected_selector);
	if (option) {
		option.setAttribute("selected", true);
	}
}
    this.extractData();
    if (this.dropdown) {
      var e = a(this.dropdown, "open");
      this.dropdown.parentNode.removeChild(this.dropdown);
      this.create();
      if(e) {
        i(this.dropdown);
      }
    }
    r(this.el, "disabled") ? this.disable() : this.enable();
}上面紅字,是增加的部份,直接修改 Set 8, 2023 的 dist 版本,所有變數都被 minify. 使用解法3, 就不用再套用上面的解法1 或解法2.
結論
選擇用那一個,其實差異不大,在專案裡有需要使用關鍵字過濾 select 內容時,只能選擇 nice select 1, 但是如果沒有需要 search 功能該選 nice select 1 還是 nice select 2? 也許選 nice select 2 利大於弊的樣子, 畢竟, 功能可以先放著不用, 等未來有需要時, 再開啟。

