首先要感謝好心人幫忙做了一個不需要database 的 javascript 檔案,jQuery-TWzipcode:
https://github.com/essoduke/jQuery-TWzipcode
js 檔案下載:
https://raw.githubusercontent.com/essoduke/jQuery-TWzipcode/master/jquery.twzipcode.min.js
js 使用方法:
https://code.essoduke.org/twzipcode/
線上直接Debug:
https://jsfiddle.net/hewy38m8/
我們假設 github 的網站上這個 js 檔案永遠不會被刪的話,就不用下載回來我們的網站,在html裡直接連到github 就可以了。
上面的範例是 hook 在 wp_footer,但我覺得hook 在 ‘woocommerce_after_checkout_form’ 應該會更好,或直接修改掉 form-checkout.php。
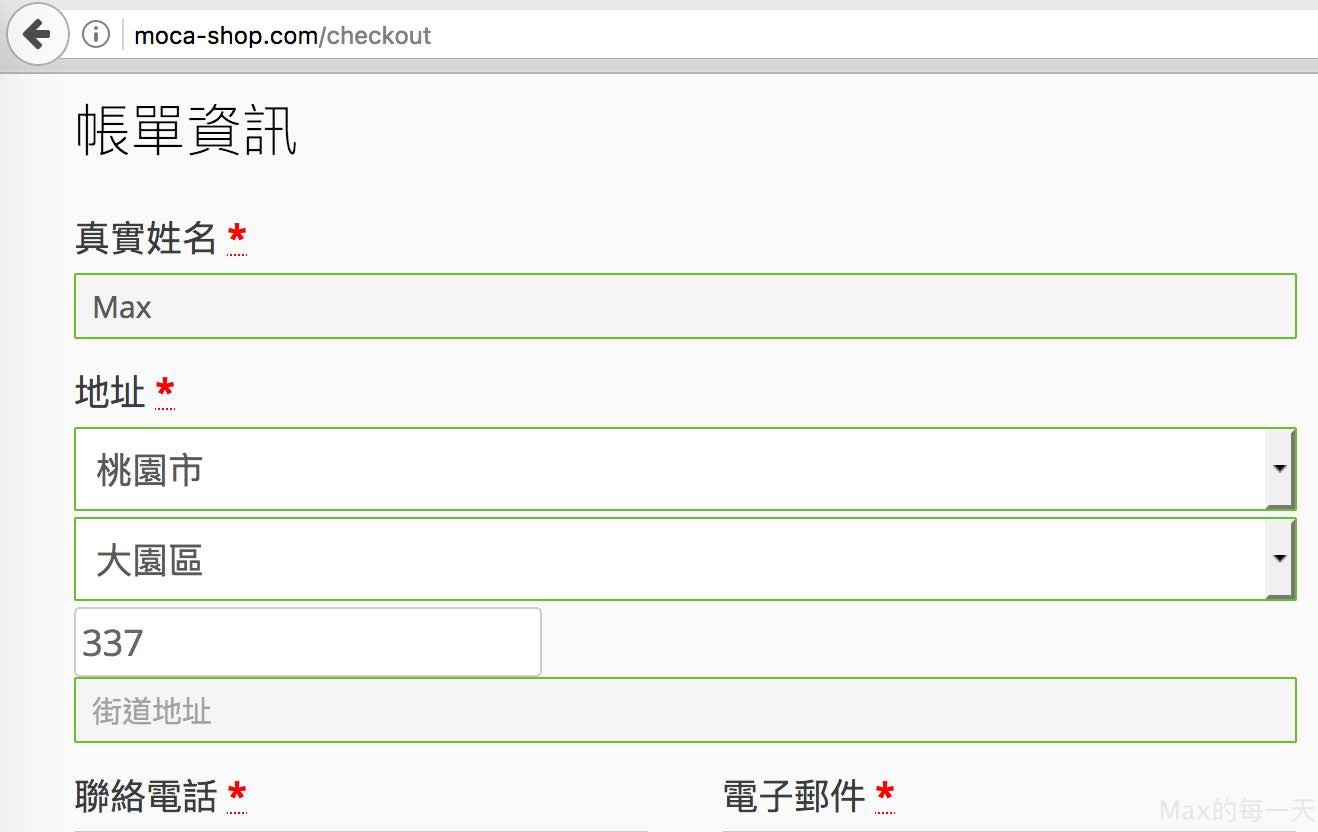
我做完的畫面:
我是直接修改 form-checkout.php 加入下面這一段:
<script type='text/javascript' src="<?php echo get_stylesheet_directory_uri(); ?>/js/jquery.twzipcode.min.js"></script>
<script>
//感謝 essoduke 大的郵遞區號專案 https://github.com/essoduke/jQuery-TWzipcode
//路徑視使用需求而改,預設是抓取目前使用的主題 /js/ 目錄下的 jquery.twzipcode.min.js 檔案
//可以從 https://raw.githubusercontent.com/essoduke/jQuery-TWzipcode/master/jquery.twzipcode.min.js 這裡抓下來放進去

jQuery(document).ready(function(){
 jQuery('<div id="billing_twzipcode"></div>').insertBefore('#billing_address_1');
 jQuery('<div id="shipping_twzipcode"></div>').insertBefore('#shipping_address_1');
 function changecb(){
 if (jQuery(this)[0].parentNode.id == 'shipping_twzipcode'){
 jQuery('#shipping_twzipcode').twzipcode('get', function (county, district, zipcode) {
 jQuery('#shipping_state').val(county);
 jQuery('#shipping_city').val(district);
 jQuery('#shipping_postcode').val(zipcode);
 });
 } else {
 jQuery('#billing_twzipcode').twzipcode('get', function (county, district, zipcode) {
 jQuery('#billing_state').val(county);
 jQuery('#billing_city').val(district);
 jQuery('#billing_postcode').val(zipcode);
 });
 }
 }
 //billing
 jQuery('#billing_twzipcode').twzipcode({
 readonly:true,
 onCountySelect:changecb,
 onDistrictSelect:changecb,
 'countySel' : jQuery('#billing_state').val(),
 'districtSel' : jQuery('#billing_city').val(),
 });
 //shipping
 jQuery('#shipping_twzipcode').twzipcode({
 readonly:true,
 onCountySelect:changecb,
 onDistrictSelect:changecb,
 'countySel' : jQuery('#shipping_state').val(),
 'districtSel' : jQuery('#shipping_city').val(),
 });
});
</script>
我用的 functions.php
add_filter('woocommerce_default_address_fields', 'cwp_custom_address_fields');
function cwp_custom_address_fields($fields) {

 $fields2['first_name'] = $fields['first_name'];
 $fields2['first_name']['class'] = array('form-row-wide');
 //$fields2['last_name'] = $fields['last_name'];
 $fields2['state'] = $fields['state'];
 //$fields2['state']['class'] = array('form-row-first');
 $fields2['state']['class'] = array('hidden');
 //$fields2['state']['label_class'] = array('hidden');
 $fields2['state']['required'] = false;
 $fields2['state']['type'] = 'text';

 $fields2['postcode'] = $fields['postcode'];
 //$fields2['postcode']['class'] = array('form-row-last');
 $fields2['postcode']['class'] = array('hidden');
 $fields2['postcode']['required'] = false;
 $fields2['postcode']['type'] = 'text';

 $fields2['city'] = $fields['city'];
 $fields2['city']['label'] = '鄉鎮[市]區';
 $fields2['city']['class'] = array('hidden');
 $fields2['city']['required'] = false;
 $fields2['city']['type'] = 'text';

 //$fields2['city']['class'] = array('form-row-first');
 $fields2['address_1'] = $fields['address_1'];
 $fields2['address_1']['required'] = false;

 //$fields2['address_1']['class'] = array('form-row-last');
 if (isset($fields['email'])) {
 $fields2['email'] = $fields['email'];
 }
 if (isset($fields['phone'])) {
 $fields2['phone'] = $fields['phone'];
 }
 //$fields2['country'] = $fields['country'];
 //$fields2['company'] = $fields['company'];
 //$fields2['address_2'] = $fields['address_2'];

 return $fields2;
}
說明:我還是保留了 state 來放「縣市」,保留city放「鄉鎮[市]區」,由於設定[‘class’] = array(‘hidden’); 或是設定 type=’hidden’ 都無效,所以 type保留為 ‘text’, 在 cart-shipping.php 裡增加 javascript 把整個 P 的 tag (field) 都hide 起來即可。
資料來源:
[WordPress] 調整適合 WooCommerce 在台銷售結帳頁欄位(含地址郵遞區號選擇)
https://www.mxp.tw/2017/04/22/wordpress-%E8%AA%BF%E6%95%B4%E9%81%A9%E5%90%88-woocommerce-%E5%9C%A8%E5%8F%B0%E9%8A%B7%E5%94%AE%E7%B5%90%E5%B8%B3%E9%A0%81%E6%AC%84%E4%BD%8D/
thanks for feedback.
不過我 hook 在 footer 的用意也算是讓那段 JS 能夠在其他對應頁面要有一樣效果時方便套用的簡單作法就是。
ex: 如果單純 hook 在 woocommerce_after_checkout_form 的話,那在 my-account/edit-address/ 這消費者後台路徑要調整住址的這塊就無支援下拉選取郵遞區號的功能了。 勢必還要為了這頁面去複寫
參考看看囉~
MAX大您好:
感謝提供教學,地址該欄,順利地出現縣市、區域的下拉功能了!
但是郵遞區號的placeholder會出現地址的placeholder,不知道是什麼問題呢?