Connector在處理HTTP請求時,會使用不同的protocol。不同的Tomcat版本支持的protocol不同,其中最典型的protocol包括BIO、NIO和APR(Tomcat7中支持這3種,Tomcat8增加了對NIO2的支持,而到了Tomcat8.5和Tomcat9.0,則去掉了對BIO的支持)。
BIO是Blocking IO,顧名思義是阻塞的IO;NIO是Non-blocking IO,則是非阻塞的IO。而APR是Apache Portable Runtime,是Apache可移植運行庫,利用本地庫可以實現高可擴展性、高性能;Apr是在Tomcat上運行高併發應用的首選模式,但是需要安裝apr、apr-utils、tomcat-native等包。
Tomcat 官方說明如下:
http://tomcat.apache.org/tomcat-7.0-doc/config/http.html
Q:如何指定protocol
Connector使用哪種protocol,可以通過<connector>元素中的protocol屬性進行指定,也可以使用默認值。
指定的protocol取值及對應的協議如下:
- HTTP/1.1:默認值,使用的協議與Tomcat版本有關
- org.apache.coyote.http11.Http11Protocol:BIO
- org.apache.coyote.http11.Http11NioProtocol:NIO
- org.apache.coyote.http11.Http11Nio2Protocol:NIO2
- org.apache.coyote.http11.Http11AprProtocol:APR
如果沒有指定protocol,則使用默認值HTTP/1.1,其含義如下:在Tomcat7中,自動選取使用BIO或APR(如果找到APR需要的本地庫,則使用APR,否則使用BIO);在Tomcat8中,自動選取使用NIO或APR(如果找到APR需要的本地庫,則使用APR,否則使用NIO)。
Tomcat 官方設定教學如下:
https://tomcat.apache.org/tomcat-7.0-doc/ssl-howto.html
Tomcat can use two different implementations of SSL:
- the JSSE implementation provided as part of the Java runtime (since 1.4)
- the APR implementation, which uses the OpenSSL engine by default.
The exact configuration details depend on which implementation is being used. If you configured Connector by specifying generic protocol="HTTP/1.1" then the implementation used by Tomcat is chosen automatically. If the installation uses APR – i.e. you have installed the Tomcat native library – then it will use the APR SSL implementation, otherwise it will use the Java JSSE implementation.
As configuration attributes for SSL support significantly differ between APR vs. JSSE implementations, it is recommended to avoid auto-selection of implementation. It is done by specifying a classname in the protocol attribute of the Connector.
To define a Java (JSSE) connector, regardless of whether the APR library is loaded or not, use one of the following:
<!-- Define a HTTP/1.1 Connector on port 8443, JSSE NIO implementation -->
<Connector protocol="org.apache.coyote.http11.Http11NioProtocol"
           port="8443" .../>

<!-- Define a HTTP/1.1 Connector on port 8443, JSSE BIO implementation -->
<Connector protocol="org.apache.coyote.http11.Http11Protocol"
           port="8443" .../>
Alternatively, to specify an APR connector (the APR library must be available) use:
<!-- Define a HTTP/1.1 Connector on port 8443, APR implementation -->
<Connector protocol="org.apache.coyote.http11.Http11AprProtocol"
           port="8443" .../>
If you are using APR, you have the option of configuring an alternative engine to OpenSSL.
<Listener className="org.apache.catalina.core.AprLifecycleListener"
          SSLEngine="someengine" SSLRandomSeed="somedevice" />
The default value is
<Listener className="org.apache.catalina.core.AprLifecycleListener"
          SSLEngine="on" SSLRandomSeed="builtin" />
So to use SSL under APR, make sure the SSLEngine attribute is set to something other than off. The default value is on and if you specify another value, it has to be a valid engine name.
SSLRandomSeed allows to specify a source of entropy. Productive system needs a reliable source of entropy but entropy may need a lot of time to be collected therefore test systems could use no blocking entropy sources like “/dev/urandom” that will allow quicker starts of Tomcat.
The final step is to configure the Connector in the $CATALINA_BASE/conf/server.xml file, where $CATALINA_BASE represents the base directory for the Tomcat instance. An example <Connector> element for an SSL connector is included in the default server.xml file installed with Tomcat. To configure an SSL connector that uses JSSE, you will need to remove the comments and edit it so it looks something like this:
<!-- Define a SSL Coyote HTTP/1.1 Connector on port 8443 -->
<Connector
           protocol="org.apache.coyote.http11.Http11NioProtocol"
           port="8443" maxThreads="200"
           scheme="https" secure="true" SSLEnabled="true"
           keystoreFile="${user.home}/.keystore" keystorePass="changeit"
           clientAuth="false" sslProtocol="TLS"/>
The APR connector uses different attributes for many SSL settings, particularly keys and certificates. An example of an APR configuration is:
<!-- Define a SSL Coyote HTTP/1.1 Connector on port 8443 -->
<Connector
           protocol="org.apache.coyote.http11.Http11AprProtocol"
           port="8443" maxThreads="200"
           scheme="https" secure="true" SSLEnabled="true"
           SSLCertificateFile="/usr/local/ssl/server.crt"
           SSLCertificateKeyFile="/usr/local/ssl/server.pem"
           SSLVerifyClient="optional" SSLProtocol="TLSv1+TLSv1.1+TLSv1.2"/>
The configuration options and information on which attributes are mandatory, are documented in the SSL Support section of the HTTP connector configuration reference. Make sure that you use the correct attributes for the connector you are using. The BIO and NIO connectors use JSSE whereas the APR/native connector uses APR.
The port attribute is the TCP/IP port number on which Tomcat will listen for secure connections. You can change this to any port number you wish (such as to the default port for https communications, which is 443). However, special setup (outside the scope of this document) is necessary to run Tomcat on port numbers lower than 1024 on many operating systems.
If you change the port number here, you should also change the value specified for the
redirectPortattribute on the non-SSL connector. This allows Tomcat to automatically redirect users who attempt to access a page with a security constraint specifying that SSL is required, as required by the Servlet Specification.
After completing these configuration changes, you must restart Tomcat as you normally do, and you should be in business. You should be able to access any web application supported by Tomcat via SSL. For example, try:
https://localhost:8443/and you should see the usual Tomcat splash page (unless you have modified the ROOT web application). If this does not work, the following section contains some troubleshooting tips.
Q:BIO/NIO有何不同
在accept隊列中接收連接(當客户端向服務器發送請求時,如果客户端與OS完成三次握手創建了連接,則OS將該連接放入accept隊列);在連接中獲取請求的數據,生成request;調用servlet容器處理請求;返回response。為了便於後面的説明,首先明確一下連接與請求的關係:連接是TCP層面的(傳輸層),對應socket;請求是HTTP層面的(應用層),必須依賴於TCP的連接實現;一個TCP連接中可能傳輸多個HTTP請求。
在BIO實現的Connector中,處理請求的主要實體是JIoEndpoint對象。JIoEndpoint維護了Acceptor和Worker:Acceptor接收socket,然後從Worker線程池中找出空閒的線程處理socket,如果worker線程池沒有空閒線程,則Acceptor將阻塞。其中Worker是Tomcat自帶的線程池,如果通過<Executor>配置了其他線程池,原理與Worker類似。
在NIO實現的Connector中,處理請求的主要實體是NIoEndpoint對象。NIoEndpoint中除了包含Acceptor和Worker外,還是用了Poller,處理流程如下圖所示
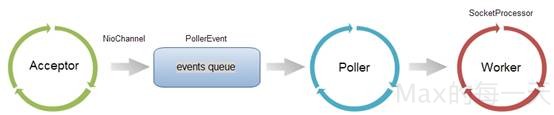
Acceptor接收socket後,不是直接使用Worker中的線程處理請求,而是先將請求發送給了Poller,而Poller是實現NIO的關鍵。Acceptor向Poller發送請求通過隊列實現,使用了典型的生產者-消費者模式。在Poller中,維護了一個Selector對象;當Poller從隊列中取出socket後,註冊到該Selector中;然後通過遍歷Selector,找出其中可讀的socket,並使用Worker中的線程處理相應請求。與BIO類似,Worker也可以被自定義的線程池代替。
通過上述過程可以看出,在NIoEndpoint處理請求的過程中,無論是Acceptor接收socket,還是線程處理請求,使用的仍然是阻塞方式;但在“讀取socket並交給Worker中的線程”的這個過程中,使用非阻塞的NIO實現,這是NIO模式與BIO模式的最主要區別(其他區別對性能影響較小,暫時略去不提)。而這個區別,在併發量較大的情形下可以帶來Tomcat效率的顯着提升:
目前大多數HTTP請求使用的是長連接(HTTP/1.1默認keep-alive為true),而長連接意味着,一個TCP的socket在當前請求結束後,如果沒有新的請求到來,socket不會立馬釋放,而是等timeout後再釋放。如果使用BIO,“讀取socket並交給Worker中的線程”這個過程是阻塞的,也就意味着在socket等待下一個請求或等待釋放的過程中,處理這個socket的工作線程會一直被佔用,無法釋放;因此Tomcat可以同時處理的socket數目不能超過最大線程數,性能受到了極大限制。而使用NIO,“讀取socket並交給Worker中的線程”這個過程是非阻塞的,當socket在等待下一個請求或等待釋放時,並不會佔用工作線程,因此Tomcat可以同時處理的socket數目遠大於最大線程數,併發性能大大提高。
Tomcat處理請求的過程
在accept隊列中接收連接(當客户端向服務器發送請求時,如果客户端與OS完成三次握手創建了連接,則OS將該連接放入accept隊列);在連接中獲取請求的數據,生成request;調用servlet容器處理請求;返回response。
acceptCount 設定值:
accept隊列的長度;當accept隊列中連接的個數達到acceptCount時,隊列滿,進來的請求一律被拒絕。默認值是100。
maxConnections 設定值:
Tomcat在任意時刻接收和處理的最大連接數。當Tomcat接收的連接數達到maxConnections時,Acceptor線程不會讀取accept隊列中的連接;這時accept隊列中的線程會一直阻塞着,直到Tomcat接收的連接數小於maxConnections。如果設置為-1,則連接數不受限制。
默認值與連接器使用的協議有關:NIO的默認值是10000,APR/native的默認值是8192,而BIO的默認值為maxThreads(如果配置了Executor,則默認值是Executor的maxThreads)。
在windows下,APR/native的maxConnections值會自動調整為設置值以下最大的1024的整數倍;如設置為2000,則最大值實際是1024。
maxThreads 設定值:
請求處理線程的最大數量。默認值是200(Tomcat7和8都是的)。如果該Connector綁定了Executor,這個值會被忽略,因為該Connector將使用綁定的Executor,而不是內置的線程池來執行任務。
maxThreads規定的是最大的線程數目,並不是實際running的CPU數量;實際上,maxThreads的大小比CPU核心數量要大得多。這是因為,處理請求的線程真正用於計算的時間可能很少,大多數時間可能在阻塞,如等待數據庫返回數據、等待硬盤讀寫數據等。因此,在某一時刻,只有少數的線程真正的在使用物理CPU,大多數線程都在等待;因此線程數遠大於物理核心數才是合理的。
換句話説,Tomcat通過使用比CPU核心數量多得多的線程數,可以使CPU忙碌起來,大大提高CPU的利用率。
(1)maxThreads的設置既與應用的特點有關,也與服務器的CPU核心數量有關。通過前面介紹可以知道,maxThreads數量應該遠大於CPU核心數量;而且CPU核心數越大,maxThreads應該越大;應用中CPU越不密集(IO越密集),maxThreads應該越大,以便能夠充分利用CPU。當然,maxThreads的值並不是越大越好,如果maxThreads過大,那幺CPU會花費大量的時間用於線程的切換,整體效率會降低。
(2)maxConnections的設置與Tomcat的運行模式有關。如果tomcat使用的是BIO,那幺maxConnections的值應該與maxThreads一致;如果tomcat使用的是NIO,那幺類似於Tomcat的默認值,maxConnections值應該遠大於maxThreads。
(3)通過前面的介紹可以知道,雖然tomcat同時可以處理的連接數目是maxConnections,但服務器中可以同時接收的連接數為maxConnections+acceptCount 。acceptCount的設置,與應用在連接過高情況下希望做出什幺反應有關係。如果設置過大,後面進入的請求等待時間會很長;如果設置過小,後面進入的請求立馬返回connection refused。
線程池Executor
Executor元素代表Tomcat中的線程池,可以由其他組件共享使用;要使用該線程池,組件需要通過executor屬性指定該線程池。
Executor是Service元素的內嵌元素。一般來説,使用線程池的是Connector組件;為了使Connector能使用線程池,Executor元素應該放在Connector前面。Executor與Connector的配置舉例如下:
<Executor name="tomcatThreadPool" namePrefix ="catalina-exec-" maxThreads="150" minSpareThreads="4" />

<Connector executor="tomcatThreadPool" port="8080" protocol="HTTP/1.1" connectionTimeout="20000" redirectPort="8443" acceptCount="1000" />
Executor的主要屬性包括:
- name:該線程池的標記
- maxThreads:線程池中最大活躍線程數,默認值200(Tomcat7和8都是)
- minSpareThreads:線程池中保持的最小線程數,最小值是25
- maxIdleTime:線程空閒的最大時間,當空閒超過該值時關閉線程(除非線程數小於minSpareThreads),單位是ms,默認值60000(1分鐘)
- daemon:是否後台線程,默認值true
- threadPriority:線程優先級,默認值5
- namePrefix:線程名字的前綴,線程池中線程名字為:namePrefix+線程編號
查看當前狀態
如何查看服務器中的連接數和線程數。
查看服務器的狀態,大致分為兩種方案:(1)使用現成的工具,(2)直接使用Linux的命令查看。
現成的工具,如JDK自帶的jconsole工具可以方便的查看線程信息(此外還可以查看CPU、內存、類、JVM基本信息等),Tomcat自帶的manager,收費工具New Relic等。下圖是jconsole查看線程信息的界面:

說明:jconsole 只能在有 GUI 的情況下正常執行,如果是 ssh 到遠端 server, jconsole 只能看到黑畫面…
連接數 (connection)
假設Tomcat接收http請求的端口是8083,則可以使用如下語句查看連接情況:
netstat –nat | grep 8083
線程 (process)
ps命令可以查看進程狀態,如執行如下命令:
ps –e | grep java
透過這個指令可以看到,java 線程(process) id.
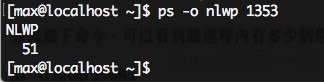
number of light-weight process
通過如下命令,可以看到該進程內有多少個線程;其中,nlwp含義是number of light-weight process。
ps –o nlwp 1351
執行畫面:
真正在running的線程數量
ps -eLo pid,stat | grep 1353 | wc -l
執行畫面:
