要在Ubuntu 上架 wordpress 流程如下。
先安裝 mysql
- sudo apt-get update
- sudo apt-get install mysql-server
- mysql_secure_installation
Create a MySQL Database and User for WordPress
The first step that we will take is a preparatory one. WordPress uses MySQL to manage and store site and user information. We have MySQL installed already, but we need to make a database and a user for WordPress to use.
To get started, log into the MySQL root (administrative) account by issuing this command:
- mysql -u root -p
You will be prompted for the password you set for the MySQL root account when you installed the software.
First, we can create a separate database that WordPress can control. You can call this whatever you would like, but we will be using wordpress in this guide to keep it simple. You can create the database for WordPress by typing:
- CREATE DATABASE wordpress DEFAULT CHARACTER SET utf8 COLLATE utf8_unicode_ci;
Note: Every MySQL statement must end in a semi-colon (;). Check to make sure this is present if you are running into any issues.
Next, we are going to create a separate MySQL user account that we will use exclusively to operate on our new database. Creating one-function databases and accounts is a good idea from a management and security standpoint. We will use the name wordpressuser in this guide. Feel free to change this if you’d like.
We are going to create this account, set a password, and grant access to the database we created. We can do this by typing the following command. Remember to choose a strong password here for your database user:
- GRANT ALL ON wordpress.* TO ‘wordpressuser‘@’localhost’ IDENTIFIED BY ‘password‘;
You now have a database and user account, each made specifically for WordPress. We need to flush the privileges so that the current instance of MySQL knows about the recent changes we’ve made:
- FLUSH PRIVILEGES;
Exit out of MySQL by typing:
- EXIT;
附註: 上面的 wordpress database name 和 wordpressuser 帳號,建議換成自己在使用的。
附上我用的 SQL
CREATE DATABASE myweb DEFAULT CHARACTER SET utf8 COLLATE utf8_unicode_ci;

CREATE USER 'mywebuser'@'localhost' IDENTIFIED BY 'myweb-user-password$!123';

GRANT ALL PRIVILEGES ON myweb.* TO mywebuser@localhost;

FLUSH PRIVILEGES;
Install Additional PHP Extensions
When setting up our LAMP stack, we only required a very minimal set of extensions in order to get PHP to communicate with MySQL. WordPress and many of its plugins leverage additional PHP extensions.
We can download and install some of the most popular PHP extensions for use with WordPress by typing:
- sudo apt-get update
- sudo apt-get install php-curl php-gd php-mbstring php-mcrypt php-xml php-xmlrpc
Each WordPress plugin has its own set of requirements. Some may require additional PHP packages to be installed. Check your plugin documentation to discover its PHP requirements. If they are available, they can be installed with apt-get as demonstrated above.
We will restart Apache to leverage these new extensions in the next section. If you are returning here to install additional plugins, you can restart Apache now by typing:
- sudo systemctl restart apache2
附註:apache2 可能還沒有被安裝,請先下
sudo apt-get install apache2
附註:如果 apache2 無法執行 php,就是連到 index.php 會丟出 source code 請服用下面的指令:
sudo apt-get install lamp-server^
sudo apt-get install wordpress
附註:如果不是在ubuntu 而是在 centos 請服用下面的指令:
sudo yum install php php-mysql
sudo yum install wordpress
Adjust Apache’s Configuration to Allow for .htaccess Overrides and Rewrites
Next, we will be making a few minor adjustments to our Apache configuration. Currently, the use of .htaccess files is disabled. WordPress and many WordPress plugins use these files extensively for in-directory tweaks to the web server’s behavior.
Additionally, we will enable mod_rewrite, which will be needed in order to get WordPress permalinks to function correctly.
Enable .htaccess Overrides
Open the primary Apache configuration file to make our first change:
- sudo nano /etc/apache2/apache2.conf
To allow .htaccess files, we need to set the AllowOverride directive within a Directory block pointing to our document root. Towards the bottom of the file, add the following block:
. . .

<Directory /var/www/html/>
    AllowOverride All
</Directory>

. . .
附註:copy 上面這幾行 paste 到 /etc/apache2/apache2.conf
When you are finished, save and close the file.
hen you are finished, save and close the file.
Enable the Rewrite Module
Next, we can enable mod_rewrite so that we can utilize the WordPress permalink feature:
- sudo a2enmod rewrite
Download WordPress
Now that our server software is configured, we can download and set up WordPress. For security reasons in particular, it is always recommended to get the latest version of WordPress from their site.
Change into a writable directory and then download the compressed release by typing:
- cd /tmp
- curl -O https://wordpress.org/latest.tar.gz
Extract the compressed file to create the WordPress directory structure:
- tar xzvf latest.tar.gz
We will be moving these files into our document root momentarily. Before we do, we can add a dummy .htaccess file and set its permissions so that this will be available for WordPress to use later.
Create the file and set the permissions by typing:
- touch /tmp/wordpress/.htaccess
- chmod 660 /tmp/wordpress/.htaccess
We’ll also copy over the sample configuration file to the filename that WordPress actually reads:
- cp /tmp/wordpress/wp-config-sample.php /tmp/wordpress/wp-config.php
We can also create the upgrade directory, so that WordPress won’t run into permissions issues when trying to do this on its own following an update to its software:
- mkdir /tmp/wordpress/wp-content/upgrade
Now, we can copy the entire contents of the directory into our document root. We are using the -a flag to make sure our permissions are maintained. We are using a dot at the end of our source directory to indicate that everything within the directory should be copied, including hidden files (like the .htaccessfile we created):
- sudo cp -a /tmp/wordpress/. /var/www/html
Configure the WordPress Directory
Before we do the web-based WordPress setup, we need to adjust some items in our WordPress directory.
Adjusting the Ownership and Permissions
One of the big things we need to accomplish is setting up reasonable file permissions and ownership. We need to be able to write to these files as a regular user, and we need the web server to also be able to access and adjust certain files and directories in order to function correctly.
We’ll start by assigning ownership over all of the files in our document root to our username. We will use www-data as our username in this guide, but you should change this to match whatever your sudo user is called. We will assign group ownership to the www-data group:
- sudo chown -R www-data:www-data /var/www/html
附註:www-data 帳號可以執行 adduser www-data 完成
附註:www-data 群組可以執行 addgroup www-data 完成
There are a few other fine-grained permissions we’ll adjust. First, we’ll give group write access to the wp-content directory so that the web interface can make theme and plugin changes:
- sudo chmod g+w /var/www/html/wp-content
As part of this process, we will give the web server write access to all of the content in these two directories:
- sudo chmod -R g+w /var/www/html/wp-content/themes
- sudo chmod -R g+w /var/www/html/wp-content/plugins
This should be a reasonable permissions set to start with. Some plugins and procedures might require additional tweaks.
Setting up the WordPress Configuration File
open the WordPress configuration file:
- nano /var/www/html/wp-config.php
. . .

define('DB_NAME', 'wordpress');

/** MySQL database username */
define('DB_USER', 'wordpressuser');

/** MySQL database password */
define('DB_PASSWORD', 'password');
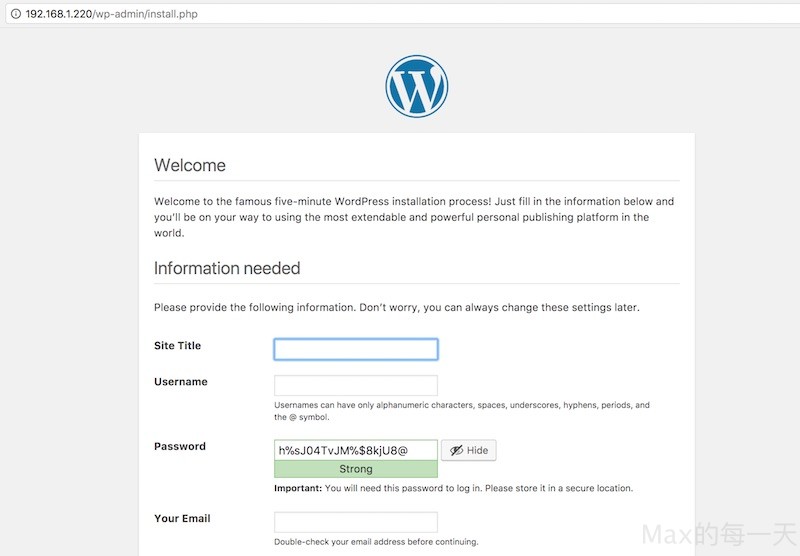
Complete the Installation Through the Web Interface
In your web browser, navigate to your server’s domain name or public IP address:
http://server_domain_or_IP完成後的我的畫面如下:
附註:/var/www/html/ 目錄下預設有 index.html ,您可能需要手動去刪除掉該檔案,那是 apache 內建的首頁。
