這篇文章的目的是把點陣圖片(.bmp 或 .png) 產生成一個字型檔,原來滿簡單的,網路上有很多驗證過且完整的解法。
相關網頁:
- 妄想者造字记
https://zhuanlan.zhihu.com/p/23607678 - 中文像素字体制作
https://indienova.com/u/hata/blogread/26923 - Converting rasters to SVG, and creating a rudimentary font with font-forge – Part 4 of an XKCD font saga
https://pelson.github.io/2017/xkcd_font_raster_to_vector_and_basic_font_creation/ - 字体生成小记
http://www.shushilvshe.com/data/font-build.html - 幫字型檔補缺字
https://max-everyday.com/2020/02/how-to-add-new-glyph-to-font/
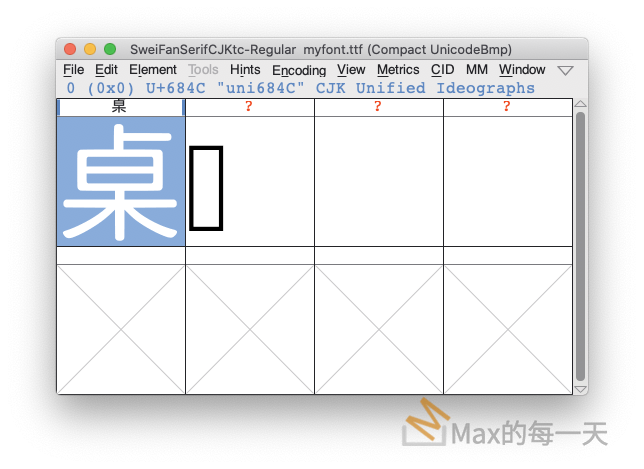
最後成功後的執行畫面:

上面圖片裡的「桌」是前一篇文章的產物,參考看看:
Python 在圖像上輸出文字
https://stackoverflow.max-everyday.com/2020/12/python-draw-text/
有了 bmp 檔案後,要怎麼變成字型檔案呢?常見的解法是先用 potrace,Inkscape,autotrace 自動描邊的軟體把圖片轉成向量格式,手動的指令可以參考看看:
Looking at the potrace website you can apparently go directly from BMP to SVG.
$ potrace -s input.bmp -o output.svg
autotrace
Another option to potrace is autotrace.
$ autotrace -output-file ouput.svg -output-format svg --color-count 4 input.bmp
You’ll likely have to play with the --color-count to get an image that suites your needs.
有了 .svg 檔案,可以手動在 fontforge 裡做匯入(import),當然最理想的作法是寫python腳本程式來自動匯入,才會比較有效率和省時間。
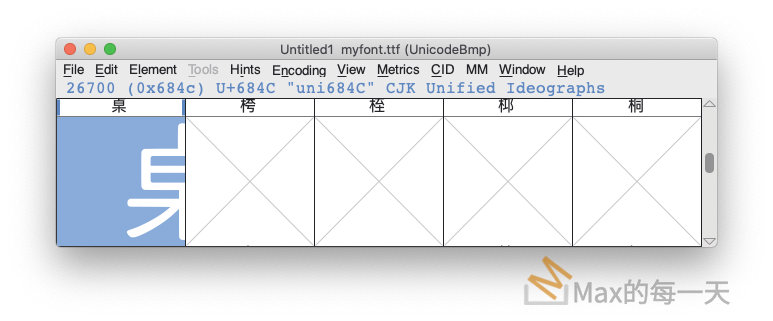
直接使用空的字型檔案,或直接匯入 .svg 都會讓圖片產生偏移,奇怪的是坐標內容是正確的,執行結果:
解決這個問題滿簡單的,不要使用空的字型檔,而是去更新一個要修改的字(.glyph) 就可以解決了,max 的 sample code:
https://github.com/max32002/MaxFontScripts/blob/master/bmp2ttf.py
import os

BMP_PATH = './bmp/'
SVG_PATH = './svg/'
FONT_PROJECT= './myfont.sfdir'
FONT_PATH= './myfont.ttf'

import fontforge
# new font.
#font = fontforge.font()
# open exist font.
print("Open font:", FONT_PROJECT)
font=fontforge.open(FONT_PROJECT)

# prepare environment
if not os.path.exists(BMP_PATH):
    # make dir.
    print('mkdir bmp folder')
    os.system('mkdir -p ' + BMP_PATH)

if not os.path.exists(SVG_PATH):
    # make dir.
    print('mkdir svg folder')
    os.system('mkdir -p ' + SVG_PATH)

print('bmp transform to svg...')

for filename in os.listdir(BMP_PATH):
    bmp_filepath = os.path.join(BMP_PATH, filename)
    svg_filename = filename.replace('.bmp','.svg')
    svg_filepath = os.path.join(SVG_PATH, svg_filename)
    command='potrace -s ' + bmp_filepath + ' -o ' + svg_filepath

    try:
        os.system(command)
    except Exception as e:
        print(e)

print('bmp transform to svg finished, move svg image to svg folder.')


print('generate fonts...')

for filename in os.listdir(SVG_PATH):
    svg = os.path.join(SVG_PATH, filename)
    try:
        #image filename example: "U_001234.svg"
        glyph = font.createChar(int('0x'+filename.split('.')[0][-4:], 16) ,filename.split('.')[0])

        # force overwrite, must clear before import.
        glyph.clear()
        # if .clear() clean too many infomation, use below code instead.
        #glyph.layers[0] = fontforge.layer()
        #glyph.layers[1] = fontforge.layer()

        glyph.importOutlines(svg)

        #glyph.correctDirection()
        glyph.simplify()
        glyph.round()

    except Exception as e:
        print(e)
    except Error as err:
        print(err)

# not necessary to save, save only for debug purpose.
#font.save(FONT_PROJECT)

font.generate(FONT_PATH)
font.close()

print('generate fonts finished.^_^y')


一開始以為 glyph.clear() 會把異體字對應的table清除,實際測試額外的 AltUni2 還有被保留,還沒有去測試 Substitution2 的資料會不會因為 glyph.clear() 造成遺失。
fontforge scripting 官方說明:
https://fontforge.org/docs/scripting/python/fontforge.htm