VM 裡的 ubuntu server 的服務都無法連上, 發現 inet6 (ip v6)是有位置, 但 ip v4 拿不到 ip address.
挑戰使用下面指令, 重新跟 DHCP 要 IP還是無解:
dhclient ens3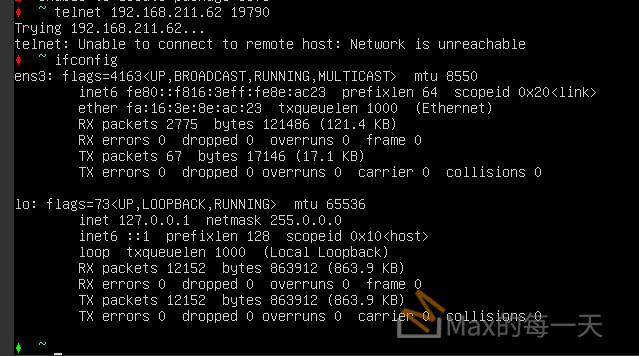
由於 ip v4 沒有功能, 造成 telent 指令會傳回錯誤訊息:
Unable to connect to remote host: Network is unreachable
由於沒有網路可以使用, 這台VM 變成直接使用 console 的方式去控制, 伺服器裡的資料也帶不出來。
服用下面指令, 就可以手動地, 把ipv4 加入 ens3
sudo ip addr add 192.168.211.17/16 dev ens3
sudo ip link set dev ens3 up
sudo ip link set dev ens3 down
資料來源: Configuring networks
https://ubuntu.com/server/docs/network-configuration
說明:ens3 是網卡名,可能會是eth0
up 是啟用。
down 會被停用。
Execute Command Using SSH
Run / Execute Command SSH Command Syntax
The syntax is as follows for executing commands over ssh:
ssh user1@server1 command1
ssh user1@server1 'command2'

# pipe #
ssh user1@server1 'command1 | command2'

# multiple commands, must enclose in quotes
ssh admin@box1 "command1; command2; command3"
Copy Files From Remote to Local
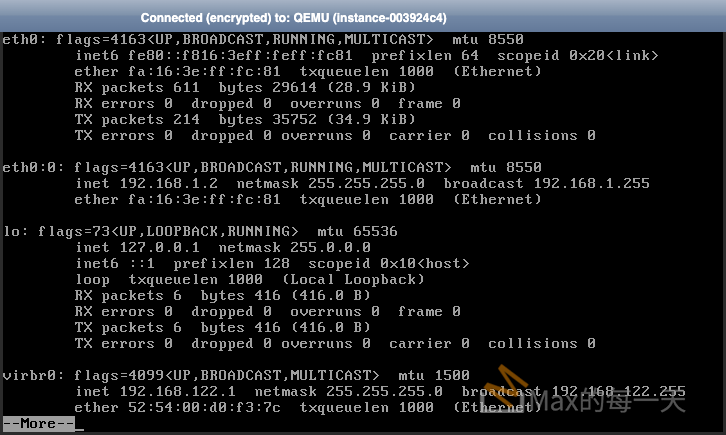
有 ip address 之後, 就可以使用 scp 指令, 把伺服器裡的檔案 copy 出來:
A better way to understand this is by use of an example. Take a scenario where you want to copy files from remote system. To copy the files you will need to first invoke the SCP, followed by the remote username@IP address, path to file.
If you do not specify the path, it is assumed as default in this case which will be the user’s home directory, this will be followed the path where the file will be stored locally.
The Syntax
scp <remote_username>@<IPorHost>:<PathToFile> <LocalFileLocation>
I wanted to copy a file named remote-path from the remote device with this address 192.168.211.17.
scp remote-account@192.168.211.17:remote-path .scp 指令語法:
usage: scp [-346ABCOpqRrsTv] [-c cipher] [-D sftp_server_path] [-F ssh_config]
[-i identity_file] [-J destination] [-l limit]
[-o ssh_option] [-P port] [-S program] source … target
比較常用的應該只有大寫P 的 port 參數.
Copy File From Local Host to Remote Server
如果是要推檔案出去別台電腦:
scp -P port file remote-account@destination:/remote-pathEX:
scp *.zip user@destination_host:/home/max/滿方便的,可以自動 overwrite exist file.
Execute remote command
用單引號或雙引號即可
ssh user1@server1 'command2'

# pipe
$ ssh user1@server1 'command1 | command2'

# multiple commands
$ ssh user1@server1 "command1; command2; command3"
To execute multiple commands, each command needs to be separated using a semicolon(;) to be enclosed within a single quote or double quote,
Add backup user account
在 ubuntu add user:
sudo adduser newuser設定帳號密碼
sudo passwd newuser檢查groups
groups newuserubuntu 加入為管理者:
sudo usermod -aG sudo newuserrocky 加入為管理者:
sudo usermod -aG wheel newuser切換目前的使用者帳號:
sudo su - newuser建立 SSH 金鑰, 指令用法:
usage: ssh-keygen [-q] [-b bits] [-t dsa | ecdsa | ed25519 | rsa] [-m format]
          [-N new_passphrase] [-C comment] [-f output_keyfile]
ssh-keygen -p [-P old_passphrase] [-N new_passphrase] [-m format]
           [-f keyfile]
ssh-keygen -i [-m key_format] [-f input_keyfile]
ssh-keygen -e [-m key_format] [-f input_keyfile]
ssh-keygen -y [-f input_keyfile]
ssh-keygen -c [-P passphrase] [-C comment] [-f keyfile]
ssh-keygen -l [-v] [-E fingerprint_hash] [-f input_keyfile]
ssh-keygen -B [-f input_keyfile]
ssh-keygen -D pkcs11
ssh-keygen -F hostname [-f known_hosts_file] [-l]
ssh-keygen -H [-f known_hosts_file]
ssh-keygen -R hostname [-f known_hosts_file]
ssh-keygen -r hostname [-f input_keyfile] [-g]
ssh-keygen -G output_file [-v] [-b bits] [-M memory] [-S start_point]
ssh-keygen -T output_file -f input_file [-v] [-a rounds] [-J num_lines]
          [-j start_line] [-K checkpt] [-W generator]
ssh-keygen -s ca_key -I certificate_identity [-h] [-U]
          [-D pkcs11_provider] [-n principals] [-O option]
          [-V validity_interval] [-z serial_number] file ...
ssh-keygen -L [-f input_keyfile]
ssh-keygen -A
ssh-keygen -k -f krl_file [-u] [-s ca_public] [-z version_number]
          file ...
ssh-keygen -Q -f krl_file file ...
指令範例:
ssh-keygen -t ed25519說明: 參數 [-t dsa | ecdsa | ed25519 | rsa], 有4種加密方式。
檢查 authorized_keys , 確認公鑰已經在裡面:
cat ~/.ssh/authorized_keys要切換 ssh 是密碼格式, 還是用key, 修改 /etc/ssh/sshd_config 檔案。
sudo vim /etc/ssh/sshd_config把 PasswordAuthentication 的 no 改成 yes。
/etc/ssh/sshd_config 檔案裡可以設定那些帳號才可以登入:
AllowUsers user1 user2再重啟 sshd service:
service sshd restart詳細的 ssh 操作流程, 請參考:
How To Configure SSH Key-Based Authentication on a Linux Server
https://www.digitalocean.com/community/tutorials/how-to-configure-ssh-key-based-authentication-on-a-linux-server
ssh 指令用法:
usage: ssh [-46AaCfGgKkMNnqsTtVvXxYy] [-B bind_interface]
           [-b bind_address] [-c cipher_spec] [-D [bind_address:]port]
           [-E log_file] [-e escape_char] [-F configfile] [-I pkcs11]
           [-i identity_file] [-J [user@]host[:port]] [-L address]
           [-l login_name] [-m mac_spec] [-O ctl_cmd] [-o option] [-p port]
           [-Q query_option] [-R address] [-S ctl_path] [-W host:port]
           [-w local_tun[:remote_tun]] destination [command [argument ...]]
Rocky Linux
這個問題,不只在Ubuntu Linux 在Rocky Linux 也會遇到:
一樣,是少了 inet4
使用指令:
dhclient eth0結果:畫面會卡住。只能按Ctrl+C 中斷。
使用
sudo ip addr add 192.168.211.17/16 dev eth0
sudo ip link set dev eth0 up
測試結果無效…,網路回不來。
建議,有重要的檔案,最好設定排程,定時地備份到別台電腦,避免這個網卡掛掉,資料拿不出來。