常見會出血的字: gjpqyýÿ¿¡{}Q
這些字和中文字一起訓練會幾個問題, 首先是偏移在不同位置, 會出現不同的大小, 例如 “H” 這個符號, 一模一模的輸入, 設定不同的 y offset, 出現在晝面上/中/下 不同的位置, 推論出來的結果會不一樣大, 形狀也會有差異.
- 解法1:
使用 x offet / y offset 來解決, 但這個只能解決一小部份的字, 因為加了 offset 會讓部份的字掛掉, 例如為了讓 g/p/q/y 等字向上, 就會讓很多大寫字或符號的字因為 offset 造成被crop. - 解法2:
先讓畫布寬高乘2, 原本為 256 就讓畫布為 512, 然後在 x offset / y offset 各設為原本的 1/2, 就是 128, 晝上原本 256×256 的字, 然後把這個圖轉成 svg 之後, 進入 fontforge 把這個glyph x offset / y offset 各設 -128 就可以拿到正常的圖片, 要使用這一個解法, 在訓練的時候, 就要資料都用 512 的大小去訓練, - 解法3: (建議)
原本應該使用 font size=256 情況下, 在 infer 時改使用 font size=217 (=256 x 0.85), 也可以試著調整為 font size=205(=256 x 0.80), 由於推論前 font size 就縮小了, 所以在取得推論結果之後, 再 resize 回去.
例如: 如果font size使用 217 是原本的 0.85, resize canvas size 設為 294 (=256 x 1.15) 就可以取得放大後的結果.
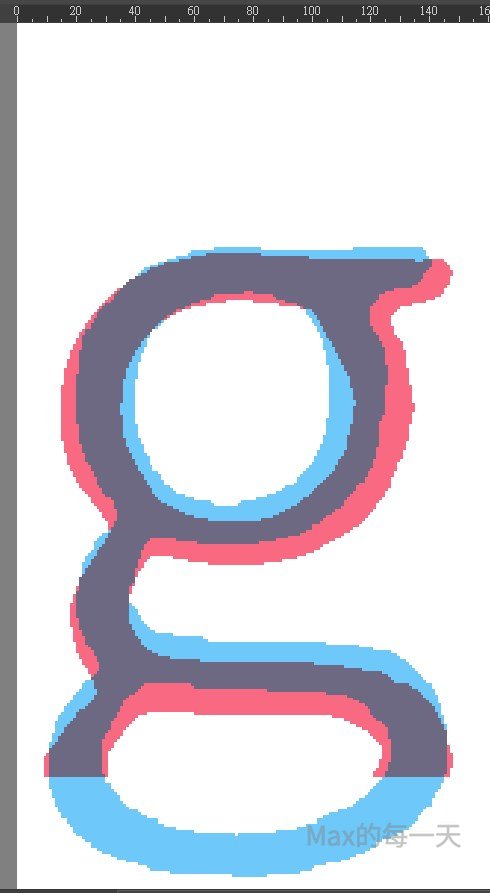
說明: 紅字是直接推論, 會被 crop 到, 藍色是使用先縮小後放大, 黑色部份是二個推論重疊的部份, 解法3有符合預期的效果.
正常 infer script:
python infer.py --experiment_dir=experiments ^
                --checkpoint_dir=experiments/checkpoint-maruko-regular-384 ^
                --input_nc=1 ^
                --gpu_ids=cuda:0 ^
                --resume=231 ^
                --self_attention ^
                --from_txt ^
                --filename_rule=unicode_int ^
                --src_font=source/font/SweiGothicCJKjp-DemiLight.ttf ^
                --src_font_y_offset=0 ^
                --src_txt_file=charset/charset_maruko_alpha.txt ^
                --canvas_size=384 ^
                --char_size=384 ^
                --label=16
修改後:
python infer.py --experiment_dir=experiments ^
                --checkpoint_dir=experiments/checkpoint-maruko-regular-alpha ^
                --input_nc=1 ^
                --gpu_ids=cuda:0 ^
                --resume=232 ^
                --self_attention ^
                --from_txt ^
                --filename_rule=unicode_int ^
                --canvas_size=384 ^
                --char_size=307 ^
                --resize_canvas=460 ^
                --src_font=source/font/SweiGothicCJKjp-DemiLight.ttf ^
                --src_font_y_offset=28 ^
                --src_txt_file=charset/charset_maruko_alpha.txt ^
                --crop_src_font ^
                --label=20
說明: char_size = 307 (=384 * 0.8) , resize_canvas=460 (=384 * 1.2)
在一開始的產生訓練的字集也有相同的問題.
1:1 的訓練, 在 384×384 的script:
python font2img.py --src_font=source/font/SweiGothicCJKjp-DemiLight.ttf ^
                   --dst_font=source/font/ZenMaruGothic-Regular.ttf ^
                   --charset=charset/charset_maruko_alpha.txt ^
                   --canvas_size=384 ^
                   --char_size=384 ^
                   --sample_dir=source/paired_images-maruko-alpha ^
                   --label=0 ^
                   --dst_y_offset=-113 ^
                   --mode=font2font
說明: 384×384中文字的情況下, noto sans 不用 offset, ZenMaruGothic offset y=-113 會剛好對齊.
python font2img.py --src_font=source/font/SweiGothicCJKjp-DemiLight.ttf ^
                   --dst_font=source/font/ZenMaruGothic-Regular.ttf ^
                   --charset=charset/charset_maruko_alpha.txt ^
                   --canvas_size=384 ^
                   --char_size=319 ^
                   --sample_dir=source/paired_images-maruko-alpha ^
                   --label=0 ^
                   --dst_y_offset=-113 ^
                   --mode=font2font
384 * 0.80 = 307, 新的 char size=307
384 – 307 = 77, offset = 77, 這是上+下=77, 所以 x,y offset=77 / 2=38.5
隨意微調後的 script:
python font2img.py --src_font=source/font/SweiGothicCJKjp-DemiLight.ttf ^
                   --dst_font=source/font/ZenMaruGothic-Regular.ttf ^
                   --sample_dir=source/paired_images-maruko-regular-384-alpha ^
                   --charset=charset/charset_maruko_alpha.txt ^
                   --canvas_size=384 ^
                   --char_size=307 ^
                   --label=0 ^
                   --src_x_offset=38 ^
                   --src_y_offset=28 ^
                   --dst_x_offset=38 ^
                   --dst_y_offset=-58 ^
                   --disable_auto_fit ^
                   --mode=font2font
主要就 gy 這2個字, 畫的位置很低, 所以讓 y_offset 高一點, 讓下半部可以完整顯示出來.
另一個解法是在繪圖時就置中, 參考看看:
程式碼範例:
image2 = Image.new('RGB', (100, 100), 'white')
draw2 = ImageDraw.Draw(image2)
draw2.text((50 + font2_x_offset, 50 + font2_y_offset), char, font=font2, fill='black', anchor='mm')
完整程式碼:
https://github.com/max32002/MaxFontScripts/blob/master/compare_fonts.py