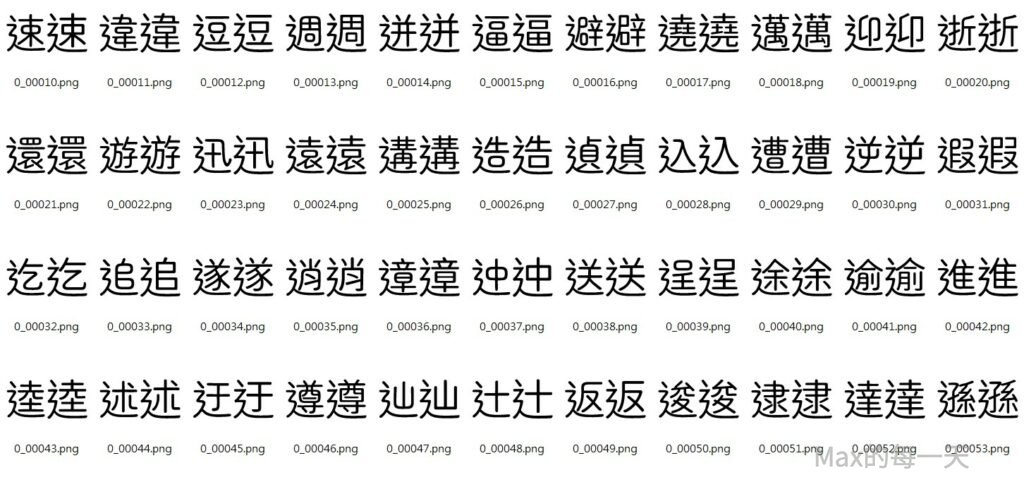
有些符號, 訓練的資料裡可能完全沒出現過, 例如:
- 辵部: 有二點與一點的差別, 追槌樋進近,蓬遊鏈
- 草部: cjktc 是完全分開, 而且還有一些例外, 例如: 歡觀勸敬驚警灌夢等字, 不算是草.
- 食部: cjktc 是橫線, cjksc 是一點45度的線, cjkjp 是直線; 最左下角, cjktc 是直線加橫線, 且有長腳, cjktc 是類似一個勾, 只有微微的長出一點點腳.
- 糸部寫法不同, 日系是寫成小, 台灣是3個點, 而且上部半寫法還是有微小的差異.
- 州部件, 常見: 洲酬駲, 完整: 喌州栦洲絒詶酬銂駲
- 豦部件, 劇勮噱壉懅據澽璩籧臄蘧豦躆遽醵鐻
- 釁
- 西
除了上面的差異之外, 辵部在 cjk jp / cjk tc 形狀不同, 這個完全沒有出現在訓練的資料, 如果不讓模型學習到正確的對應, 那未來的推論結果永遠都不會有所改進.
解法1:
先透過 zen maru 產生高品質字,
python generate_glyphs.py --font source/font/ ^
    --output_dir=experiments/infer/from_cjkjp_to_cjktc ^
    --font=source/font/ZenMaruGothic-Regular.ttf ^
    --file=experiments/infer/charset_modified-regular-384.txt ^
    --font_size=384 ^
    --canvas_size=384 ^
    --y_offset=-48 ^
    --clear ^
    --filename_rule=unicode_int
再產生對照的圖檔:
rd /q/s experiments\infer\from_cjkjp_to_cjktc-paired
python font_image_combiner.py --source_image_dir=experiments/infer/from_cjkjp_to_cjktc ^
    --target_font_path=source/font/SweiGothicCJKtc-DemiLight.ttf ^
    --output_dir=experiments/infer/from_cjkjp_to_cjktc-paired ^
    --filename_prefix="0_3" ^
    --reverse ^
    --canvas_size=384 ^
    --char_size=384 ^
    --disable_auto_fit ^
    --filename_rule=unicode_int
針對部份文字, 是可以使用其他字型裡的字來取代, 可以使用下面的script:
python generate_glyphs.py --font source/font/ ^
    --output_dir=experiments/infer/from_notosan_to_zenmaru_cjktc ^
    --font=source/font/SweiGothicCJKtc-DemiLight.ttf ^
    --file=experiments/infer/charset_modified-regular-384.txt ^
    --font_size=384 ^
    --canvas_size=384 ^
    --y_offset=0 ^
    --clear ^
    --filename_rule=unicode_int
generate_glyphs.py 教學:
https://codereview.max-everyday.com/generate_glyphs/
font_image_combiner.py 教學:
https://codereview.max-everyday.com/font_image_combiner/
解法1, 有些沒辦法處理, 就是筆畫寫法不同時, 這些字請改用解法2.
解法2:
先把訓練一小段時間的模型, 使用 cjk tc 把辵部(字根,部件)圖片取出來, 做一次推論, 取辵部相關的字, 建議使用下面的網址來取得:
https://zi-hi.com/sp/uni/CJKSeeker
使用 cjkseeker 會得到比較完整的資料集,
如果 cjkseeker 網站連不上, 可以改用”中國哲學書電子化計劃”
https://ctext.org/dictionary.pl?if=gb
要取出資料夾裡的圖片, 可以使用腳本:
copy_selected_image_out.py --input infer-folder --output infer-folder-8279 --range=8279,864c可以取得草部的圖片.
get_ttf_chars.py --input image_folder --mode=unicode_image即可取得草部圖片charset list, 把 list 存入 charset/charset_test.txt, 先取得 cjktc 的推論結果:
python infer.py --experiment_dir=experiments ^
                --experiment_checkpoint_dir=experiments/checkpoint-maruko ^
                --gpu_ids=cuda:0 ^
                --input_nc=1 ^
                --batch_size=32 ^
                --resume=1 ^
                --from_txt ^
                --canvas_size=512 ^
                --char_size=512 ^
                --generate_filename_mode=unicode_int ^
                --src_font=source/font/SweiGothicCJKtc-Thin.ttf ^
                --src_font_y_offset=0 ^
                --src_txt_file=charset/charset_test.txt ^
                --crop_src_font ^
                --label=19
有了列表, 把charset list 存到 charset_test.txt 串, 看看與 cjktc 與原字型的對映:
python font2img.py --src_font=source/font/SweiGothicCJKtc-DemiLight.ttf ^
                   --dst_font=source/font/ZenMaruGothic-Regular.ttf ^
                   --charset=charset/charset_test.txt ^
                   --sample_dir=source/paired_images-maruko-debug ^
                   --label=0 ^
                   --mode=font2font
說明: 為了方便比對, 這邊建議不要下 –shuffle 參數, 預設 font2img 會去除留白, 想保留空白區域, 請增加下列參數:
                   --canvas_size=512 ^
                   --char_size=512 ^
                   --x_offset=0 ^
                   --y_offset=-150 ^
                   --disable_auto_fit ^
察看與 cjkjp 與原字型的對映:
python font2img.py --src_font=source/font/SweiGothicCJKjp-DemiLight.ttf ^
                   --dst_font=source/font/ZenMaruGothic-Regular.ttf ^
                   --charset=charset/charset_test.txt ^
                   --sample_dir=source/paired_images-maruko-debug ^
                   --label=0 ^
                   --mode=font2font
說明: 這個步驟可以省略, 如果是直接挑戰修改 paired images 是可以直接在對照表這裡修改, 就可以略過下一個步驟.
修改好的推論結果在路徑: experiments/infer/modified-regular-384, 執行下面指令:
python font_image_combiner.py --source_image_dir=experiments/infer/modified-regular-384 ^
    --target_font_path=source/font/SweiGothicCJKtc-DemiLight.ttf ^
    --output_dir=source/modified-regular-384 ^
    --filename_prefix="" ^
    --reverse ^
    --canvas_size=384 ^
    --char_size=384 ^
    --disable_auto_fit ^
    --filename_rule=unicode_int
說明:
- 重新使用 SweiGothicCJKtc-DemiLight.ttf 做對映.
- 輸出的路徑在: source/modified-regular-384
Script 詳細教學: 生成字型與圖像的對照表
https://codereview.max-everyday.com/font_image_combiner/
產生的 mapping 預覽: (左邊是正確答案 zen maru, 右邊是 noto sans)

command mode 進入 source/paired_images_modified-regular-256, 執行指令:
ren source\paired_images_modified-regular-256\0_0* 0_3*說明: 預設檔名是 0_0*, 置換成不同開頭的名稱, 避免之後的 script 誤刪和覆蓋掉這一個 “人工手動” 修改過的訓練資料.
如果之前修改過是 256×256, 想改用 512×512 訓練, 要放大即有圖片:
python resize_all_image.py --input source\paired_images_modified-regular-256 --output source\paired_images_modified-regular-512 --width=1024集中管理 “人工手動” 處理過的檔案, 到特定資料夾, 避免被刪除, 執行指令:
xcopy source\paired_images_modified-regular-512\*.png source\do_not_delete-maruko-regular-512集中好之後, 執行 script, 讓整個打包流程, 從頭到尾再自動化執行一次.
上面要人工處理很麻煩, 而且還有資料會改版本的問題, 後來的解法是使用下面的指令, 同步修改後的資料夾為 paired_images 資料夾
rd /q/s experiments\infer\modified-regular-384-cjktc-paired
python font_image_combiner.py --source_image_dir=experiments/infer/modified-regular-384-cjktc ^
    --target_font_path=source/font/SweiGothicCJKtc-DemiLight.ttf ^
    --output_dir=experiments/infer/modified-regular-384-cjktc-paired ^
    --filename_prefix="0_4" ^
    --reverse ^
    --canvas_size=384 ^
    --char_size=384 ^
    --disable_auto_fit ^
    --filename_rule=unicode_int
xcopy /y experiments\infer\modified-regular-384-cjktc-paired source\do_not_delete-maruko-regular-384-tc

@ ...................................................
@ remove charset of [modified-regular-384] from formated-tc.
@ ...................................................
cd C:\Max\Documents\zi2zi-pytorch\experiments\infer
python \max\sh\get_image_chars.py --input modified-regular-384-cjktc
cd C:\Max\Documents\zi2zi-pytorch\charset
python \max\sh\remove_selected_char.py ^
    --input charset_ZenMaruGothic-formated-tc.txt ^
    --remove ..\experiments\infer\charset_modified-regular-384-cjktc.txt ^
    --output charset_ZenMaruGothic-formated-tc.txt
針對修改過的圖檔, 從 cjkjp 與 zen maru 的對應表中移除, 避免 cjktc 學習到 cjk jp 的寫法.
都變成自動化的流程後, 就執行自動打包的 script, 執行 font2imge.py 與 pakcage.py 變成 train.obj
除了上的做法之外, 也可以在 infer.py 的時候, 拿掉 –crop_src_font 參數, 就可以取到 paired_images, 對這個 image 做修改即可直接取得對應後的結果.
把修改後的檔案放到 do_not_delete_ 系列的資料夾,
修改自動產生訓練的腳本檔案, 確定這次修改的項目, 會被加入到 train.obj 之中.
結論
實際測試, 不同語言最好分開訓練, 因為同一個模型要去判斷不同語言, 難度太高, 雖然輸入的資料已經有加入 cjktc, 但實際上會推論出介於 cjktc / cjkjp 之間的草字頭. 有一些由於訓練資料的 cjktc 的草頭很接近, 留白處很少, 而 cjkjp 是幾乎相連, 因為訓練出來的結果, 會是極為接近的草字頭, 不符合預期, 但以輸入的資料來說又很合理.
要給cjktc 的模型, 在接近穩定時, 不要放入 cjkjp 與 cjktc 相沖突的資料.
要拿 cjkjp 推論結果到 cjktc 的 SOP 應該是:
- 先把 cjkjp 的 glyph 使用 font_image_combiner.py 變成 paired image.
- 人工確定 paired image 正確:
- 遇到有問題的直接用繪圖軟體修改,.
- 遇到需要參考 cjkjp 的部件, 可以使用 generate_glyphs.py 產生,
- 再把 paired image 透過 crop_images.py 再取得 glyph.