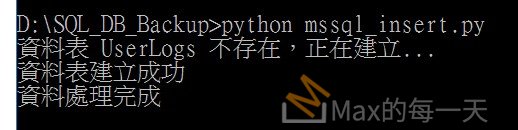
插入成功的執行結果:
要在 Python 中將資料寫入 MSSQL,最常見且穩定的組合是使用 pyodbc 套件配合微軟官方提供的 ODBC Driver。安裝檔下載:
下載適用於 SQL Server 的 ODBC 驅動程式
https://learn.microsoft.com/zh-tw/sql/connect/odbc/download-odbc-driver-for-sql-server?view=sql-server-ver17
需安裝的組件
系統層級需要安裝 Microsoft ODBC Driver for SQL Server。這是微軟提供的驅動程式,讓作業系統能夠與 SQL Server 通訊。建議安裝最新的版本(如 Driver 18 或 17)。
Python 環境則需要安裝 pyodbc 函式庫。你可以透過 pip install pyodbc 指令完成安裝。如果你的專案較具規模,通常也會搭配 sqlalchemy 配合 pandas 來處理大數據量,安裝指令為 pip install sqlalchemy pandas。
實作範例
以下是使用 pyodbc 進行單筆資料插入的標準寫法:
Python
import pyodbc

# 設定連線資訊
conn_config = {
    "DRIVER": "{ODBC Driver 18 for SQL Server}",
    "SERVER": "127.0.0.1", # 如果是本機也可以用 localhost 或 (local)
    "DATABASE": "你的資料庫名稱",
    "UID": "帳號",
    "PWD": "密碼",
    "Encrypt": "yes",
    "TrustServerCertificate": "yes"
}

conn_str = ";".join([f"{k}={v}" for k, v in conn_config.items()])

def sync_database():
    conn = None
    try:
        # 建立連線
        conn = pyodbc.connect(conn_str)
        cursor = conn.cursor()

        table_name = "UserLogs"

        # 1. 檢查資料表是否存在
        check_sql = "SELECT 1 FROM sys.objects WHERE object_id = OBJECT_ID(?) AND type = 'U'"
        cursor.execute(check_sql, table_name)

        if not cursor.fetchone():
            print(f"資料表 {table_name} 不存在,正在建立...")
            # 2. 建立資料表
            create_sql = f"""
            CREATE TABLE {table_name} (
                ID INT IDENTITY(1,1) PRIMARY KEY,
                UserName NVARCHAR(50),
                ActionTime DATETIME DEFAULT GETDATE(),
                Status NVARCHAR(20)
            )
            """
            cursor.execute(create_sql)
            conn.commit()
            print("資料表建立成功")

        # 3. 執行資料插入
        insert_sql = f"INSERT INTO {table_name} (UserName, Status) VALUES (?, ?)"
        cursor.execute(insert_sql, ("Max", "Active"))
        conn.commit()
        print("資料插入成功")

        # 4. 刪除資料表 (Drop Table)
        print(f"正在刪除資料表 {table_name}...")
        drop_sql = f"DROP TABLE {table_name}"
        cursor.execute(drop_sql)
        conn.commit()
        print("資料表已刪除")

    except pyodbc.Error as e:
        print(f"資料庫操作失敗: {e}")
        if conn:
            conn.rollback()
    finally:
        if conn:
            cursor.close()
            conn.close()

if __name__ == "__main__":
    sync_database()
注意事項
在連線字串中,如果你是連線到本機測試環境且沒有設定 SSL 憑證,務必加上 TrustServerCertificate=yes 參數,否則常會因為加密安全性檢查而導致連線失敗。另外,對於大量資料的寫入,建議使用 cursor.fast_executemany = True 或者是 pandas 的 to_sql 方法,這能顯著提升寫入效能。
在 conn_config 中明確加上了 Encrypt: yes。這是因為 ODBC Driver 18 預設要求加密連線。配合 TrustServerCertificate: yes,可以跳過 SSL 憑證的有效性檢查,通常能解決無法開啟具名管道或連線逾時的問題。
如果你的 SQL Server 是 Express 版本,SERVER 欄位可能需要寫成 127.0.0.1\SQLEXPRESS 這種格式,請根據你的實例名稱進行調整。